You may change a lot of the default settings in Microsoft Word. Here are some significant ones that can increase your productivity.
When you initially use Microsoft Word, you can instantly begin generating documents. Whether you need to create a formal report for business or a school paper, the application offers a wide range of built-in features and default settings to assist you in producing the precise kind of document you require.
You notice functional toolbars, buttons, and tabs. Word also handles spelling, grammar, and other corrections for you in the background. Most people just start typing without giving these tools any thought. But by spending only a few minutes changing these options, you may enhance your use of the application.
XEM THÊM :
🎖️ WIN79 🎖️ Cổng game đẳng cấp vượt thời gian
1. The Spelling,
Grammar, and Proofing
Settings
Changing Word's default spelling and grammatical rules is an excellent approach to start tailoring the program to your needs. These settings are useful for ensuring that you don't use poor grammar or misspell terms. However, in some circumstances they can also be annoying.
For instance, the company you work for may have a name that is a word-and-number combination or all capital letters. So that you don't always notice error indicators when writing your documents, you can change the settings for these kinds of circumstances.
On your Windows computer, open any document in Word. Select File from the menu, then Options, and finally Proofing. You will see all of your options for spelling and grammar correction. Some just apply to Word, while others apply to each of your Microsoft Office apps.
On your Mac, launch Word and open any document. Click Preferences, then click Spelling & Grammar. Both spelling and grammar settings have a long number of options.
You may check the boxes on both platforms to ignore terms in uppercase and words with numbers using the firm name from our example above. Additionally, you may turn on or off options that flag repeated words, check your spelling and grammar as you type, and ignore internet and file path addresses.
Read through each setting carefully to determine which ones you want to use and which ones you would prefer not to use.
Additionally, you can enable or disable many other grammar options, such as capitalization, comma usage, slang, and redundancy, by clicking the Settings button. Reviewing the settings that are appropriate for you in this area is also beneficial.
The button is located under Grammar on Mac and When correcting spelling and grammar in Word on Windows.
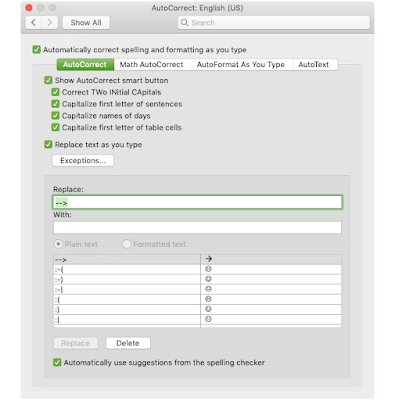
2. The AutoCorrect Settings
The AutoCorrect tool is available to help you prevent errors in your work, just as the spelling and grammar options. AutoCorrect, though, isn't always accurate when it comes to what we're actually trying to say, as we've seen time and again.
It will be automatically rectified so that only the first letter is capitalized by default if your company name happens to start with two capital letters. When writing documents, this, like our other instances with your company name, can become annoying and even distracting.
However, you could want certain things rectified for you. For convenience, capitalize the first letter of sentences and the names of the days of the week. Here is a guide on how to change those settings on Windows and Mac.
When using Word on a Windows computer, choose File from the menu, then choose Options and Proofing. At the top of the window, click the AutoCorrect button.
Choose Word from the menu bar on a Mac, then Preferences, then finally AutoCorrect.
The aforementioned kinds of AutoCorrect features can be enabled or disabled by selecting a checkbox. By selecting the Exceptions button, you may additionally add exceptions to the rules you've established. This is the ideal time to capitalize the firm name twice because Word won't flag it as a mistake going forward.
Click the Initial Caps tab, then click Exceptions. Enter the term with two capital letters at the beginning that you wish
Microsoft Word to disregard. Additionally, you can look over the built-in exceptions to the rules on the First Letter tab and create more in the Other Corrections tab. Click OK when you finish.
Back on the main AutoCorrect screen, you can check the available replacements and add your own at the bottom of the window. Special characters, emoticons, and often misspelled words are among the things that will alter when you input them. You can add to the list or delete any that you no longer want.
On the top left of the Word window is where you'll find the Quick Access Toolbar. As the name suggests, it's designed to be a location where you can rapidly get the tools you need. So spend the time to personalize this toolbar; you'll thank yourself later.
The toolbar by default has buttons for Save, Undo, and Redo. However, it is preferable to keep different instruments in this convenient location if you use them much more frequently. This enables you to complete the rapid operations you require with a single click.
Choose File from the menu on Windows, then click Options, and finally choose Quick Access Toolbar.
Choose Word from the menu bar on a Mac, then select Preferences, then select Ribbon & Toolbar. At the window's top, click the Quick Access Toolbar button.
The items on the left in the Quick Access Toolbar settings section are the commands you can use, and the items on the right are the toolbar's current contents. By choosing it and clicking the Remove arrow in the middle, you can remove an action from the toolbar. Select the action on the left, then click Add in the center to add it.
You can choose from a list of frequently used commands or open a full list of operations available in the Word tabs by selecting the drop-down box. So it's possible that you frequently use the Find, Open, Save As, and Add a Hyperlink tools. Add each one to the right by clicking on it on the left. After you are done, click OK.
You can always return to the default commands by going back to the Quick Access Toolbar settings. Then in Windows, click Reset and then Reset only Quick Access Toolbar under Customizations at the bottom of the window. Reset just Quick Access Toolbar can be done on a Mac by selecting the Settings (gear icon) button.
Another area in Word that you might want to customize is the Ribbon. You desire having quick access to the actions you utilize the most, much as the Quick Access Toolbar.
The top of Word by default is divided into tabs for Home, Insert, Draw, Design, and View. But why are the Draw and Design tabs there taking up space if you never use them?
However, you might want to utilize certain commands under the Home tab in a particular sequence that makes sense to you. This kind of personalization makes using Word more effective.
When using Windows, choose File from the menu, then click Options and Customize Ribbon.
Choose Word from the menu bar on a Mac, then select Preferences, then select Ribbon & Toolbar. At the window's top, click the Ribbon button.
The Ribbon Settings window displays the commands on the left and the presently used actions on the right, just like the Quick Access Toolbar Settings window. Using the Add and Remove arrow buttons in the middle, move them into or out of the ribbon.
- Simply check or uncheck the tabs on the right side to make changes to the ones you see across the top.
- Select the + sign (Windows) or arrow (Mac) next to the tab, then the successive indications for each set of commands to view the commands therein.
- Select the tabs or commands you want to change, then use the arrows on the right side of the list in Windows to shift them up or down. To rearrange the things on a Mac, simply select and drag them.
5. The Status Bar
The last option you probably won't modify is the Status Bar, which is located at the bottom of the Word window. However, you should take the time to customize this toolbar because it offers a wealth of useful information.
Make sure these features are accessible, for instance, if you frequently check your word count or change Word's layout views. Or, you could never need a macro recording tool or the vertical page position, in which case you can get rid of them.
Right-click the status bar in Windows, and on a Mac, you may also click on it while holding down the Control key.
Simply select the options you want to show in the Status Bar when the menu displays. As you check and uncheck the various choices, this toolbar will automatically change.
Changes to Default Word Settings Can Be Good
You might be amazed at how much better you can make a program you use frequently when you take the time to evaluate its options. You can increase the effectiveness of your work by making tiny changes like these.
Read Article:


Comments
Post a Comment